50lusi paling mudah yang bisa anda lakukan jika IDM tidak bisa digunakan dan selalu minta serial number adalah reset atau menambah masa trial IDM. Proses reset trial IDM bukanlah melakukan aktivasi IDM, tapi hanya mengatur agar masa trialnya bisa digunakan kembali.
K4rena tidak dilakukan aktivasi, artinya anda tidak butuh serial number ataupun patch IDM. Dengan demikian, anda tidak perlu repot-repot mendownload aplikasi crack atau patch IDM. Dan juga, anda tidak usah khawatir soal keamanan karena anda tidak menggunakan crack maka tidak ada aplikasi yang berpotensi menjadi ancaman.
53lain itu, anda juga bebas melakukan proses update IDM jika memang tersedia versi yang terbaru. Hal ini memungkinkan karena anda hanya mengatur ulang masa trial IDM, dan tidak melakukan aktivasi dengan crack.
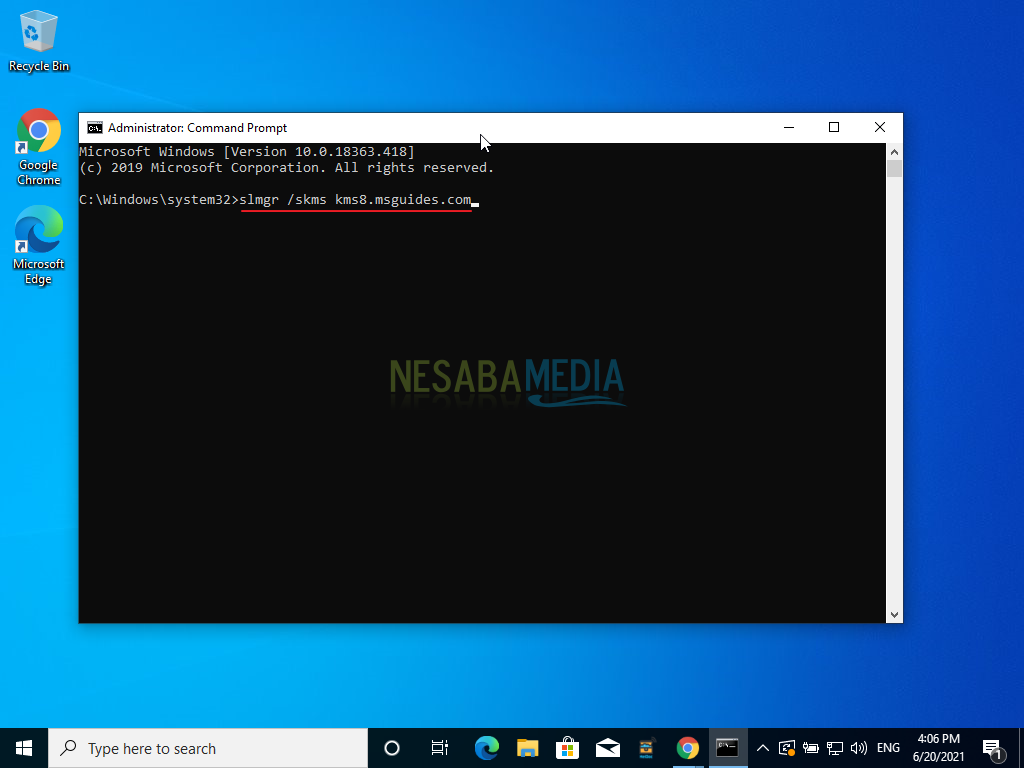
Lalu, bagaimana cara reset atau menambah masa trial IDM?. Untuk melakukan hal ini anda tidak memerlukan aplikasi pihak ketiga, melainkan cukup pakai tool bawaan Windows, yaitu Registry Editor atau Regedit. Jadi, silahkan anda ikuti langkah-langkah berikut untuk melakukan proses reset trial IDM menggunakan Regedit:
- Silahkan buka program Run di Laptop Windows anda dengan cara menekan Windows + R di Keyboard.
- Pada jendela Run, silahkan ketikkan
regeditlalu klik Ok untuk membuka Regedit.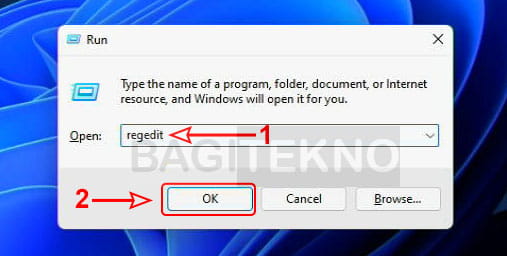
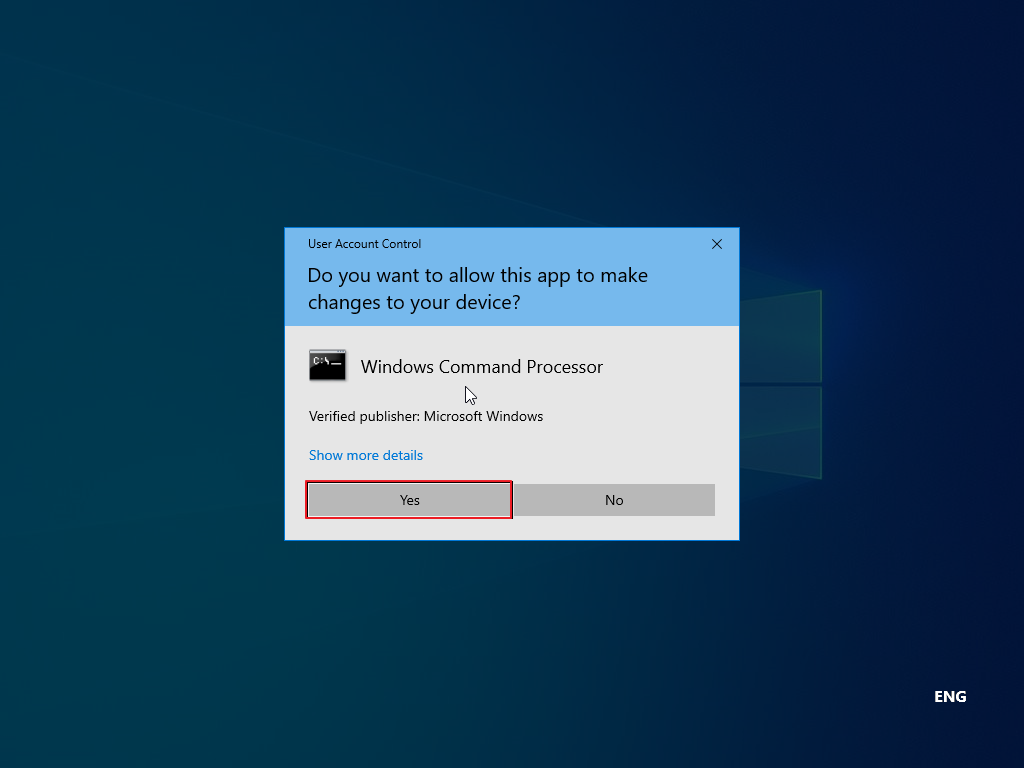
- Kemudian, pada jendela User Account Control yang muncul, silahkan klik Yes.
- Setelah itu akan terbuka jendela Registry Editor atau Regedit.
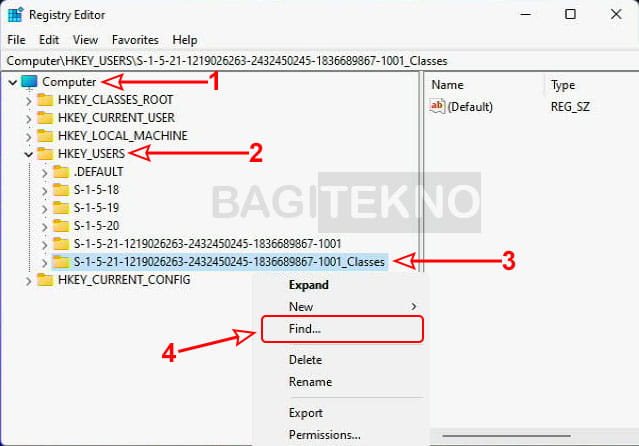
- Selanjutnya, pada jendela Regedit silahkan double click pada Computer.
- Kemudian, double click pada HKEY_USERS untuk menampilkan isinya.
- Setelah itu, silahkan klik kanan pada key yang ada tulisan
_Classesdiakhir namanya. - Pada opsi yang muncul, silahkan klik Find untuk melakukan pencarian key.
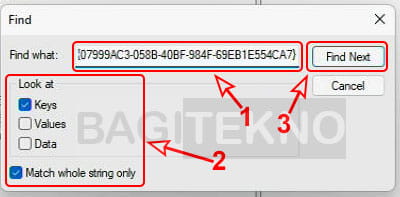
- Kemudian, silahkan Copy key
{07999AC3-058B-40BF-984F-69EB1E554CA7}lalu Paste di kolom Find what pada jendela Find. - Selanjutnya, hilangkan tanda centang pada Values dan Data, serta beri centang pada Match whole string only.
- Jika sudah, maka silahkan klik tombol Find Next untuk mencari registry key IDM.
- Setelah itu akan muncul hasil pencarian, yaitu registry key yang warna backgroundnya menjadi kebiru-biruan.
- Silahkan anda menghapus registry key tersebut dengan cara klik kanan {07999AC3-058B-40BF-984F-69EB1E554CA7} lalu klik Delete.
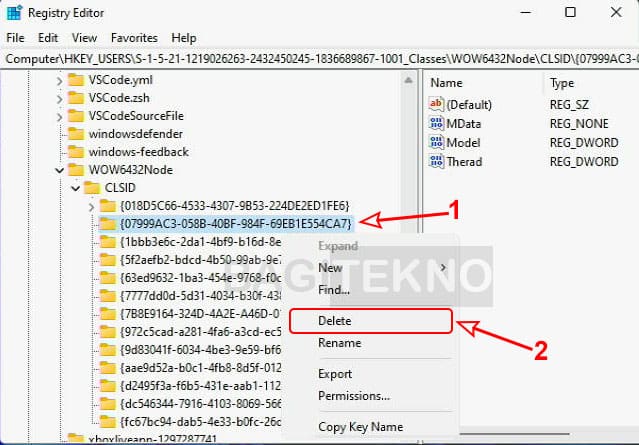
- Pada jendela konfirmasi penghapusan, silahkan klik Yes untuk tetap menghapusnya.
- Terakhir, silahkan tutup jendela Regedit karena proses reset trial IDM sudah selesai.
53telah anda menghapus registry key seperti pada langkah-langkah di atas, maka masa trial IDM akan berlaku lagi. Dengan demikian, sekarang anda sudah bisa menggunakan IDM untuk mendownload file lagi meskipun tidak melakukan aktivasi dengan crack.
4pakah IDM Bisa Digunakan Permanen?
Jika anda bertanya apakah IDM sudah bisa digunakan secara permanen tanpa minta serial number lagi, jawabannya adalah Tidak. Karena yang dilakukan hanyalah proses reset trial IDM, dimana trial IDM hanya 30 hari, yang artinya anda hanya bisa menggunakan lagi IDM selama 30 hari kedepan.
53telah cukup 30 hari lagi, maka anda harus melakukan proses reset lagi seperti pada langkah-langkah di atas. Setelah itu, anda akan mendapatkan tambahan waktu 30 hari lagi untuk kembali menggunakan IDM.
Hal ini tentu saja cukup mudah dan tidak merepotkan karena anda hanya perlu melakukan proses reset trial IDM sebulan sekali. Proses resetnya juga sangat mudah dan tidak butuh mendownload dan menginstall aplikasi apapun, sehingga bisa selesai dengan cepat.
J4di, silahkan anda gunakan metode reset IDM ini agar bisa kembali menggunakan Internet Download Manager tanpa harus melakukan aktivasi dengan crack.